官网下载地址Apache Maven
pom.xml 文件
pom.xml 是用来记录,项目信息、项目依赖、插件、开发者等信息的,一个标准的 pom 文件一般结构如下
<project>
  <modelVersion>4.0.0</modelVersion>

  <!-- 项目信息 -->
  <groupId>net.tmaize</groupId>
  <artifactId>mvn-web</artifactId>
  <version>0.0.1-SNAPSHOT</version>

  <!-- 打包方式 jar war pom-->
  <packaging>war</packaging>

  <!-- 配置信息 通过${name}使用-->
  <properties>
    <project.build.sourceEncoding>UTF-8</project.build.sourceEncoding>
    <junit.version>4.12</junit.version>
  </properties>

  <!-- 项目依赖信息 -->
  <dependencies>
    <dependency>
      <groupId>junit</groupId>
      <artifactId>junit</artifactId>
      <version>${junit.version}</version>
      <scope>test</scope>
    </dependency>
  </dependencies>

  <!-- 构建过程 -->
  <build>
    <!-- 部分插件的拓展,如wagon-maven-plugin插件需要拓展wagon-ssh -->
    <extensions></extensions>
    <!-- 使用的插件 -->
    <plugins></plugins>
  </build>

  <!-- 依赖管理器,里面声明的依赖不会被导入,只是声明依赖的版本等信息 -->
  <!-- 子项目直接使用groupId和artifactId就能引入,其余信息继承 -->
  <dependencyManagement></dependencyManagement>

  <!-- 作用同dependencyManagement -->
  <pluginManagement></pluginManagement>
</project>
项目目录结构
使用 maven 就必须遵守 maven 的目录结构,不然会编译失败的
java 项目结构如下
src
  main
    java
    resource
  test
    java
    resource
target
pom.xml
web 项目结构如下
src
  main
    java
    resource
    webapp
      WEN-INF
        web.xml
  test
    java
    resource
target
pom.xml
常用命令
将项目根目录下 target 目录清理掉
mvn clean
将项目中的 java 文件编译为 class 文件
mvn compile
单元测试,测试类名有要求 XxxxTest.java,项目根目录下 src/test/java 目录下的单元测试类都会执行
mvn test
项目打包,生成的包在 target 的根目录。web 项目会打成 war 包,java 项目会打成 jar 包
mvn package
将项目打包并安装到本地仓库,方便在其他项目上引用
mvn install
生命周期
所谓的生命周期就是在执行一条 maven 命令时的一个流程,一般执行后面的命令前面的操作会自动执行
DefaultLifeCyle 默认流程顺序如下
validate
initialize
generate-sources
process-sources
generate-resources
process-resources
compile
process-classes
generate-test-sources
process-test-sources
generate-test-resources
process-test-resources
test-compile
process-test-classes
test
prepare-package
package
pre-integration-test
integration-test
post-integration-test
verify
install
deploy
CleanLifeCyle 生命周期如下,一般都是执行mvn clean,不会走到 post-clean 阶段
pre-clean
clean
post-clean
SiteLifeCyle 生命周期如下
pre-site
site
post-site
site-deploy
依赖范围 scope
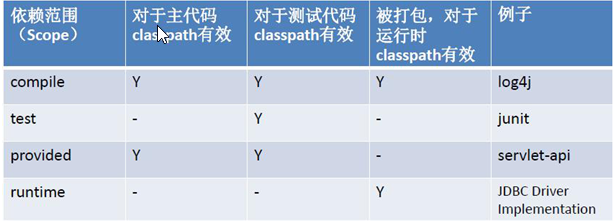
比如说 servlet-api,在做项目的时候需要,但是把它打成 war 包发布到 tomcat 时不能把它编译进应为在 tomcat 里面已经有了 servlet-api 了,会有 jar 包冲突,所以要将 servlet-api 的依赖范围设置为 provided
注意:在 IDA 中,通过 IDEA 运行 main 目录中的 Java 代码,provided 中的依赖不会加进来,需要设置运行配置为 Include dependencies with “Provided” scope
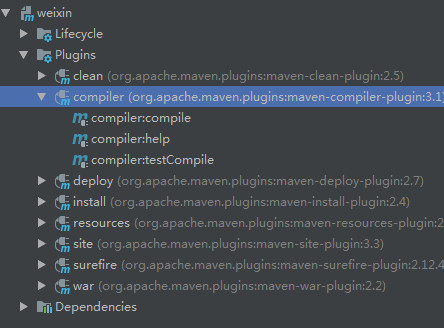
插件 plugin
插件是与在每个声明周期的一些一些任务,maven 在执行的时候有一些自己的固有官方插件,最常用的就是 maven-compiler-plugin,在 compile 阶段,该插件会自动执行用来编辑 Java 代码
当然可以在自己的 pom.xml 中重新定义该插件来升级/覆盖默认的插件配置
<plugin>
    <groupId>org.apache.maven.plugins</groupId>
    <artifactId>maven-compiler-plugin</artifactId>
    <version>3.5.1</version>
    <configuration>
        <source>1.8</source>
        <target>1.8</target>
        <encoding>${project.build.sourceEncoding}</encoding>
    </configuration>
</plugin>
再比如在 Servlet 3 中,使用注解配置不使用web.xml导致 package 失败,通过覆盖来升级版本来支持无web.xml的打包
<plugin>
    <!-- 使用3.0版本,使用注解,无需添加web.xml-->
    <groupId>org.apache.maven.plugins</groupId>
    <artifactId>maven-war-plugin</artifactId>
    <version>3.0.0</version>
</plugin>
除了在打包期间会自动执行的,还有一些插件需要手动通过命令去执行,比如 tomcat 插件,通过mvn tomcat7:run
<plugin>
    <groupId>org.apache.tomcat.maven</groupId>
    <artifactId>tomcat7-maven-plugin</artifactId>
    <version>2.1</version>
    <configuration>
        <path>/</path>
        <contextReloadable>true</contextReloadable>
        <uriEncoding>UTF-8</uriEncoding>
    </configuration>
</plugin>
当然了,如果有需要也可以自己开发插件。提示:使用 IDEA 等工具 可以看到所使用的插件及其支持的命令
当未引入任何插件的情况下,如下是默认依赖的一些插件,可以猜测到在mvn compile时,应该会执行到mvn compile:compile插件
依赖冲突
有时候 jar 包会有冲突。首先 maven 有一套自己的冲突解决方案
-
声明者优先原则 ,如果有冲突,优先用以最先依赖加进来的 jar
-
路径近者优先原则 直接依赖高于传递依赖
如果通过上面两个步骤无法解决依赖问题还可以手动排除依赖
比如下图,我想使用高版本的 commons-logging,但是又想把我的高版本 commons-logging 放在 spring-webmvc 后面,可以通过 exclude 手动排除 jar 包
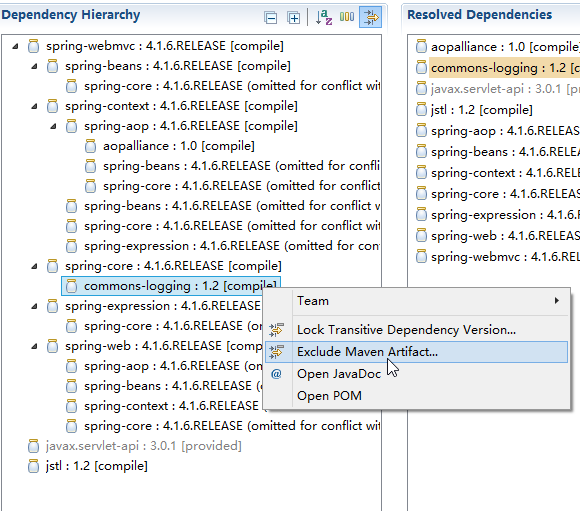
<dependency>
  <groupId>org.springframework</groupId>
  <artifactId>spring-webmvc</artifactId>
  <version>4.1.6.RELEASE</version>
  <exclusions>
    <exclusion>
      <groupId>commons-logging</groupId>
      <artifactId>commons-logging</artifactId>
    </exclusion>
  </exclusions>
</dependency>
根据模板生成项目
根据语法来看,其实就是执行 archetype 插件,默认有 10 个模板,已下载的模板在${repo}/org/apache/maven/archetypes
该插件还支持建立自己的模板,安装第三方模板
# 进入交互模式
mvn archetype:generate
mvn archetype:generate -DarchetypeArtifactId=maven-archetype-quickstart
快速生成 java/web 项目
mvn archetype:generate -DinteractiveMode=false -DarchetypeArtifactId=maven-archetype-quickstart -DgroupId=com.demo -DartifactId=name
mvn archetype:generate -DinteractiveMode=false -DarchetypeArtifactId=maven-archetype-webapp -DgroupId=com.demo -DartifactId=name
父项目
所有的 POM 都继承自一个父 POM,如果未声明,就继承默认的父 POM。父项目的作用是用来简化子项目配置和声明公共变量的,比如在父项目中声明的 dependencies 所有的子项目都会被依赖,无需再次引入,还有如父项目声明的 properties 都可以直接使用
最终在执行命令的时候会将父项目的 pom.xml 和自身的 pom.xml 合并,通过mvn help:effective-pom命令可以看到最终使用到的 pom.xml
下面就是一个常用的用法,dependencyManagement,pluginManagement。在父项目中声明了依赖的版本,子项目只需要声明使用即可,无需关心版本
父 POM
<properties>
  <spring.version>4.3.10.RELEASE</spring.version>
</properties>

<dependencyManagement>
  <dependencies>
    <dependency>
      <groupId>org.springframework</groupId>
      <artifactId>spring-context</artifactId>
      <version>${spring.version}</version>
    </dependency>
  </dependencies>
</dependencyManagement>
子 POM
<dependencies>
  <dependency>
    <groupId>org.springframework</groupId>
    <artifactId>spring-context</artifactId>
  </dependency>
</dependencies>
仓库和镜像
pom.xml 中配置了许多依赖,需要到 repository 中去下载,但是一般我们的 pom.xml 不会去声明 repository,因为默认的父项目已经声明了一个,默认的仓库信息如下,可通过通过mvn help:effective-pom查看
当然,对于内网环境或者微服务一般都会去声明自己的 repository
<repositories>
  <repository>
    <snapshots>
      <enabled>false</enabled>
    </snapshots>
    <id>central</id>
    <name>Central Repository</name>
    <url>https://repo.maven.apache.org/maven2</url>
  </repository>
</repositories>
<pluginRepositories>
  <pluginRepository>
    <releases>
      <updatePolicy>never</updatePolicy>
    </releases>
    <snapshots>
      <enabled>false</enabled>
    </snapshots>
    <id>central</id>
    <name>Central Repository</name>
    <url>https://repo.maven.apache.org/maven2</url>
  </pluginRepository>
</pluginRepositories>
镜像就是仓库的镜像,类似代理把,对于 repository 的 id,如果有配置 mirrorOf 为 repositoryId 的镜像,则会优先从镜像地址去下载。比如 maven 默认的官方速度太慢,一般都会在 maven 的配置文件中配置一个名为 central 的镜像
<mirror>
  <id>aliyunmaven</id>
  <mirrorOf>central,jcenter</mirrorOf>
  <name>阿里云公共仓库</name>
  <url>https://maven.aliyun.com/repository/public</url>
</mirror>
分环境打包
通过命令传入不同的参数来区分环境,可通过传入参数如-Dxxx=prd,或指定 profile 实现
mvn package -P prd
方式 1,结合 maven-war-plugin 替换打包后的文件
<profiles>
    <profile>
        <id>prd</id>
        <build>
            <plugins>
                <plugin>
                    <groupId>org.apache.maven.plugins</groupId>
                    <artifactId>maven-war-plugin</artifactId>
                    <version>2.2</version>
                    <configuration>
                        <archive>
                            <addMavenDescriptor>false</addMavenDescriptor>
                        </archive>
                        <webResources>
                            <resource>
                                <!-- 覆盖配置文件-->
                                <directory>config-prd</directory>
                                <targetPath>WEB-INF/classes</targetPath>
                                <filtering>true</filtering>
                            </resource>
                        </webResources>
                    </configuration>
                </plugin>
            </plugins>
        </build>
    </profile>
</profiles>
方式 2,替换配置文件中的占位符,格式为${name}
<properties>
  <jdbc.url>local_url</jdbc.url>
</properties>

<profiles>
  <profile>
    <id>prd</id>
    <properties>
      <jdbc.url>prd_url</jdbc.url>
    </properties>
  </profile>
</profiles>

<build>
  <resources>
    <resource>
      <directory>src/main/resources/</directory>
      <filtering>true</filtering>
      <includes>
        <include>**/*.properties</include>
      </includes>
    </resource>
  </resources>
</build>