思路
具体项目中一般是 web 调用 services,services 调用 dao
在 web 层采用 struts2,在 services 层采用 Spring,在 DAO 层采用 hibernate
因此整合分为两个步骤
-
Spring 和 struts2 整合
把 Action 创建交给 SpringIOC 并且不能是单例模式
-
Spring 和 Hibernate 整合
spring 配置数据源
spring 生成 sessionFactory,把数据源注入到 sessionFactory,同时指定 hibernate 核心配置文件位置
Spring 和 struts2 整合
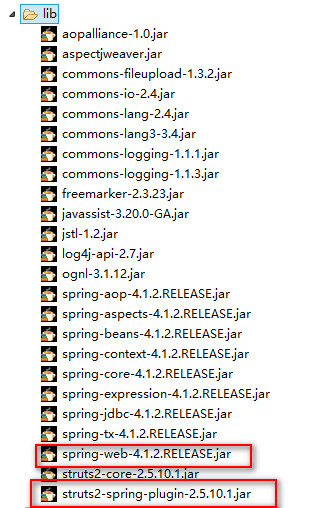
导入相关 jar 包
配置 Spring 随启动加载
- 创建 spring.xml
<?xml version="1.0" encoding="UTF-8"?>
<beans xmlns="http://www.springframework.org/schema/beans"
       xmlns:xsi="http://www.w3.org/2001/XMLSchema-instance"
       xmlns:aop="http://www.springframework.org/schema/aop"
       xmlns:tx="http://www.springframework.org/schema/tx"
       xmlns:context="http://www.springframework.org/schema/context"
       xmlns:mvc="http://www.springframework.org/schema/mvc"
       xmlns:task="http://www.springframework.org/schema/task"
       xsi:schemaLocation="
        http://www.springframework.org/schema/beans
        http://www.springframework.org/schema/beans/spring-beans.xsd
        http://www.springframework.org/schema/tx
        http://www.springframework.org/schema/tx/spring-tx.xsd
        http://www.springframework.org/schema/aop
        http://www.springframework.org/schema/aop/spring-aop.xsd
        http://www.springframework.org/schema/context
        http://www.springframework.org/schema/context/spring-context.xsd
        http://www.springframework.org/schema/mvc
        http://www.springframework.org/schema/mvc/spring-mvc.xsd
        http://www.springframework.org/schema/task
        http://www.springframework.org/schema/task/spring-task.xsd">

</beans>
- 在 web.xml 配置启动时加载配置
<context-param>
    <param-name>contextConfigLocation</param-name>
    <param-value>classpath:spring.xml</param-value>
</context-param>

<listener>
    <listener-class>org.springframework.web.context.ContextLoaderListener</listener-class>
</listener>
搭建 Struts 环境
-
创建 Action 测试类
-
创建 struts 配置文件
-
在 web.xml 设置 struts 过滤器
<filter>
    <filter-name>struts2</filter-name>
    <filter-class>org.apache.struts2.dispatcher.filter.StrutsPrepareAndExecuteFilter</filter-class>
</filter>

<filter-mapping>
    <filter-name>struts2</filter-name>
    <url-pattern>/*</url-pattern>
</filter-mapping>
整合
-
用 IOC 的方式生成 Action
<!-- 用Spring生成action对象,注意不要是默认的单例 --> <bean id="userAction" class="action.UserAction" scope="prototype"></bean> -
在 struts 中使用生成的 Action 对象
<package name="demo" extends="struts-default" namespace="/">
    <!-- 注意在class能不能写类路径,这样会创建两次,应为spring已经创建好了,写在Spring中创建的对象id名 -->
    <!-- 在struts2-spring-plugin中提供了这个功能 -->
    <action name="userAction" class="userAction"></action>
</package>
Spring 和 Hibernate 整合
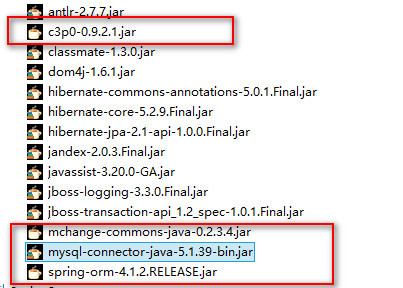
导入相关 jar 包
除了 hibernate 的基本 jar 包外,还需要数据库连接池(非必须)及 spring-orm.jar 的配合
在 Spring 配置中配置连接池
<bean id="dataSource" class="com.mchange.v2.c3p0.ComboPooledDataSource" destroy-method="close">
    <property name="driverClass" value="com.mysql.jdbc.Driver" />
    <property name="jdbcUrl" value="jdbc:mysql://127.0.0.1:3306/tian?characterEncoding=utf-8" />
    <property name="user" value="root" />
    <property name="password" value="********" />
</bean>
生成 sessionFactory 对象
-
服务器启动时加载 spring 配置文件(之间做好了),再在 Spring 中配置加载 hibernate 配置
-
在 spring 配置文件中生成 sessionFactory 对象(单例)
由于 sessionFactory 并不是直接 new 出来的而是多行代码实现的,所以不能直接用 ioc 创建
configuration = new Configuration().configure();
sessionFactory = configuration.buildSessionFactory();
好在 Spring 提供了一个对象来生成 sessionFactory。当引用这个 LocalSessionFactoryBean 的时候,比如applicationContext.getBean("localSessionFactoryBean")这样,spring 返回的不是 LocalSessionFactoryBean 本身,他会自动调用 getObject()这个方法,把真正的 session factory 返回。所以只需要做如下配置
<bean id="sessionFactory"  class="org.springframework.orm.hibernate4.LocalSessionFactoryBean">
    <!-- 注入数据源 -->
    <property name="dataSource" ref="dataSource"></property>
    <!-- 指定hibernate核心配置文件 -->
    <property name="configLocations" value="classpath:hibernate.cfg.xml"></property>
</bean>
配置 hibernate
-
建立实体类
public class User { private int id; private String name; private String birthday; private int score; //getter/setter方法 } -
为实体类建立 hibernate 配置文件
<?xml version="1.0" encoding="UTF-8"?> <!DOCTYPE hibernate-mapping PUBLIC "-//Hibernate/Hibernate Mapping DTD 3.0//EN" "http://www.hibernate.org/dtd/hibernate-mapping-3.0.dtd"> <hibernate-mapping> <!-- 配置类和表对应 --> <class name="entity.User" table="user"> <!-- 配置主键 --> <id name="id" column="id"> <!-- 设置数据库表主键增长策略 --> <generator class="native"></generator> </id> <!-- 配置其他属性和表字段对应 --> <property name="name" column="name"></property> <property name="birthday" column="birthday"></property> <property name="score" column="score"></property> </class> </hibernate-mapping> -
创建 hibernate 核心配置文件
<?xml version="1.0" encoding="UTF-8"?>
<!DOCTYPE hibernate-configuration PUBLIC "-//Hibernate/Hibernate Configuration DTD 3.0//EN" "http://www.hibernate.org/dtd/hibernate-configuration-3.0.dtd">
<hibernate-configuration>
    <session-factory>
        <!-- spring里配置数据库信息 -->

        <!-- 显示生成的sql语句 ,并格式化-->
        <property name="hibernate.show_sql">true</property>
        <property name="hibernate.format_sql">true</property>

        <!-- 配置自动创建表 -->
        <property name="hibernate.hbm2ddl.auto">update</property>

        <!-- 配置所使用的数据库的方言 -->
        <property name="hibernate.dialect">org.hibernate.dialect.MySQL5InnoDBDialect</property>

        <!-- 3.配置映射文件-->
        <mapping resource="entity/User.hbm.xml"/>

    </session-factory>
</hibernate-configuration>
dao 和 service 的注入
Action 注入 Service,Service 注入 Dao(Impl),DaoImp 注入 sessionFactory
<!-- 用Spring生成action对象,注意不要是默认的单例 -->
<bean id="userAction" class="action.UserAction" scope="prototype">
    <property name="userService" ref="userService"></property>
</bean>

<bean id="userService" class="service.UserService">
    <!-- 在代码中是接口,注入的是实现类 -->
    <property name="userDao" ref="userDaoImpl"></property>
</bean>

<bean id="userDaoImpl" class="dao.UserDaoImpl">
    <property name="sessionFactory" ref="sessionFactory"></property>
</bean>
测试
userAction 中的代码
@Override
public String execute() throws Exception {
    userService.addUser("name123", "1996-05-05", 99);
    return null;
}
userService 代码
public void addUser(String name,String brithday,int score){
    userDao.add(name,brithday,score);
}
userDaoImpl 代码
@Override
public void add(String name, String brithday, int score) {
    Session session = sessionFactory.openSession();
    User u = new User();
    u.setName(name);
    u.setBirthday(brithday);
    u.setScore(score);
    session.save(u);
    session.close();
}
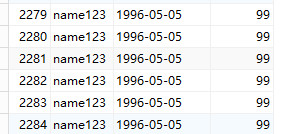
通过 url 访问 action,查看数据库是否添加了数据
开启事务
<!-- 创建事务管理器 -->
<bean id="transactionManager" class="org.springframework.orm.hibernate4.HibernateTransactionManager">
    <property name="sessionFactory" ref="sessionFactory"></property>
</bean>
<!-- 开启事务注解 -->
<tx:annotation-driven transaction-manager="transactionManager"/>
在 UserService 中添加注解
@Transactional
public class UserService {
    //...
}
使用 HibernateTemplate
生成 HibernateTemplate,并在 userDaoImpl 中注入 HibernateTemplate
<bean id="userDaoImpl" class="dao.UserDaoImpl">
    <property name="hibernateTemplate" ref="hibernateTemplate"></property>
</bean>

<bean id="hibernateTemplate" class="org.springframework.orm.hibernate4.HibernateTemplate">
    <property name="sessionFactory" ref="sessionFactory"></property>
</bean>
在 UserDaoImpl.java 里使用 HibernateTemplate
public class UserDaoImpl implements UserDao {

    private HibernateTemplate hibernateTemplate;

    public void setHibernateTemplate(HibernateTemplate hibernateTemplate) {
        this.hibernateTemplate = hibernateTemplate;
    }

    @Override
    public void add(String name, String brithday, int score) {
        User u = new User();
        u.setName(name);
        u.setBirthday(brithday);
        u.setScore(score);
        hibernateTemplate.save(u);
    }
}
错误解决
HTTP Status 500 - Could not open Hibernate Session for transaction; nested exception is java.lang.NoClassDefFoundError: org/hibernate/engine/transaction/spi/TransactionContext
原因是配置文件中用的是 hibernate4,而导入的包是 5.x 的
<!-- 创建事务管理器 -->
<bean id="transactionManager" class="org.springframework.orm.hibernate4.HibernateTransactionManager">
    <property name="sessionFactory" ref="sessionFactory"></property>
</bean>
解决方法 1:将 hibernate-core-5.1.39.Final.jar 换成 hibernate-core-4.2.4.Final.jar
解决方法 2:使用高版本的 spring 会支持 org.springframework.orm.hibernate5.HibernateTransactionManager
这里使用的是方法 1
另一种整合方式
还有一种整合方式是把 hibernate 核心配置全部都放到 spring 中,不需要再建立 hibernate 核心配置文件了
<bean id="sessionFactory"  class="org.springframework.orm.hibernate4.LocalSessionFactoryBean">
    <!-- 注入数据源 -->
    <property name="dataSource" ref="dataSource"></property>

    <property name="hibernateProperties">
        <props>
            <prop key="hibernate.show_sql">true</prop>
            <prop key="hibernate.format_sql">true</prop>
            <prop key="hibernate.hbm2ddl.auto">update</prop>
            <prop key="hibernate.dialect">org.hibernate.dialect.MySQL5InnoDBDialect</prop>
        </props>
    </property>
    <property name="mappingResources">
        <list>
            <value>entity/User.hbm.xml</value>
        </list>
    </property>
</bean
注解方式搭建
引入 struts2-convention 依赖,让 struts 配置文件中取消对 Action 的配置
Spring 自动扫包
<context:component-scan base-package="dao.daoImpl" />
daoImpl 添加注解标签
import org.springframework.context.annotation.Scope;
import org.springframework.stereotype.Component;
import dao.UserDao;

@Component(value="UserDaoImpl")
@Scope(value="singleton")
public class UserDaoImpl implements UserDao{
    @Override
    public void sayHello() {
        System.out.println("Hello");
    }
}
在 Action 里装配 dao
import javax.annotation.Resource;
import org.apache.struts2.convention.annotation.Action;
import org.apache.struts2.convention.annotation.Result;
import org.apache.struts2.convention.annotation.Results;
import com.opensymphony.xwork2.ActionSupport;
import dao.UserDao;

@Results({
    @Result(name="ok",location="/test.jsp"),
    @Result(name="failure",location="/failure.jsp")})
@Action(value="test")
public class UserAction extends ActionSupport{

    private static final long serialVersionUID = 1L;

    @Resource(name="UserDaoImpl")
    UserDao userDao;

    @Override
    public String execute() throws Exception {
        userDao.sayHello();
        return "ok";
    }
}